
Página
Ejercicio practico Calculadora
Proyecto Gradle Con el patrón de diseño POM utilizando Cucumber y Serenity (Aplicacion Calculadora)
Lo primero que realizaremos será iniciar el servidor Appium, abrimos el aplicativo de appium y nos dirigimos a la pestaña “Advanced” Configuramos los siguientes campos: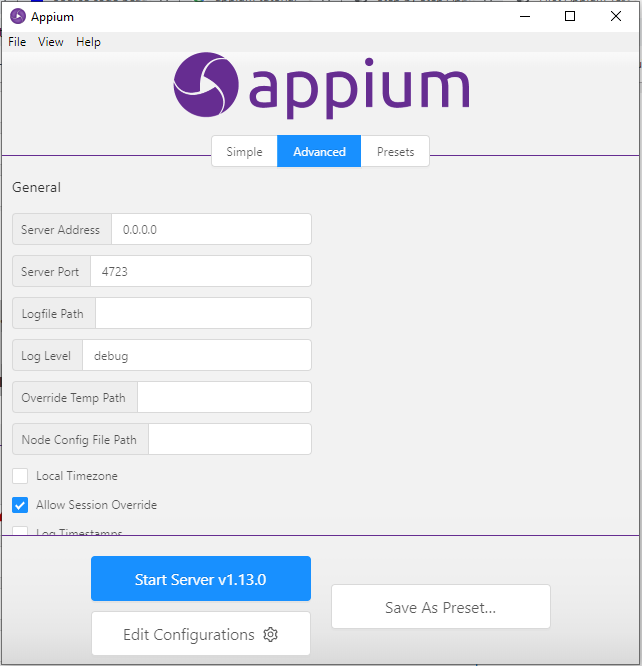

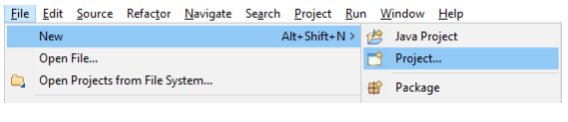
A) Lo primero que debemos hacer en eclipse es crear un proyecto gradle. Para ellos damos clic en el menú File - New – Project
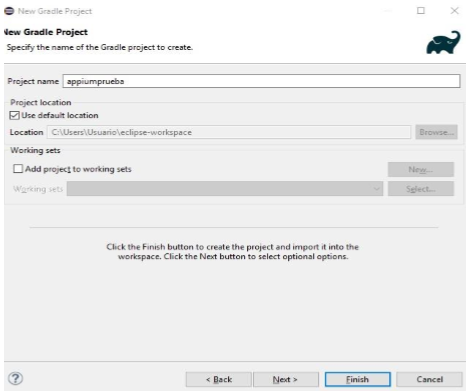
En la ventana "New Project" seleccionar la opción "Gradle project" y continuar con las opciones por defecto del asistente hasta que nos solicite ingresar el nombre del proyecto. Ingresar el nombre (en minúsculas) "appiumprueba" e ingresar la ubicación
en la que será almacenado y por último dar click en el botón "Finish".
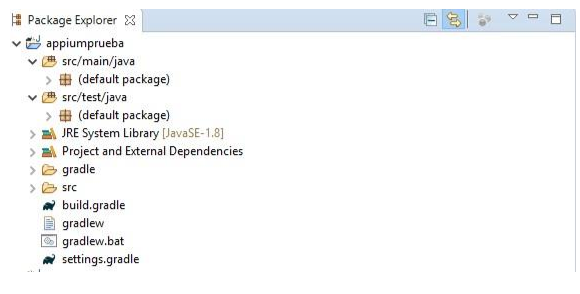
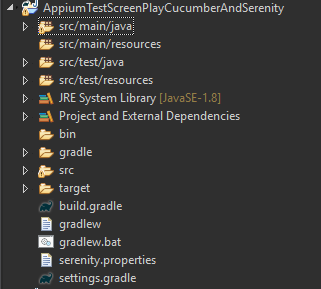
Al finalizar los pasos del asistente, en el panel del Project Explorer de Eclipse, veremos que se ha creado el proyecto "appiumprueba" el cual tiene la siguiente estructura
B) En este punto lo que haremos será agregar todas las dependencias necesarias para que nuestro proyecto trabaje correctamente. Para ello debemos modificar el archivo "build.gradle" y copiar el siguiente texto
1 2 3 4 5 6 7 8 9 10 11 12 13 14 15 16 17 18 19 20 21 22 23 24 25 26 27 28 29 30 31 32 33 34 35 36 37 38 39 |
repositories { mavenLocal() jcenter() } buildscript { repositories { mavenLocal() jcenter() } dependencies { classpath("net.serenity-bdd:serenity-gradle-plugin:2.0.2") } } apply plugin: 'java' apply plugin: 'eclipse' apply plugin: 'idea' apply plugin: 'net.serenity-bdd.aggregator' dependencies { testCompile 'net.serenity-bdd:serenity-core:2.0.2' testCompile 'net.serenity-bdd:serenity-junit:2.0.2' testCompile('junit:junit:4.12') testCompile('org.assertj:assertj-core:3.11.1') testCompile('org.slf4j:slf4j-simple:1.7.25') compile 'net.serenity-bdd:serenity-core:2.0.2' compile 'net.serenity-bdd:serenity-junit:2.0.2' compile 'net.serenity-bdd:serenity-cucumber:1.9.8' compile 'net.serenity-bdd.maven.plugins:serenity-maven-plugin:1.2.5-rc.6' compile 'org.apache.maven.plugins:maven-surefire-plugin:2.22.1' } tasks.withType(Test) { systemProperty 'webdriver.driver', System.getProperty('webdriver.driver', 'chrome') systemProperty 'tags', System.getProperty('tags', '') } gradle.startParameter.continueOnFailure = true |
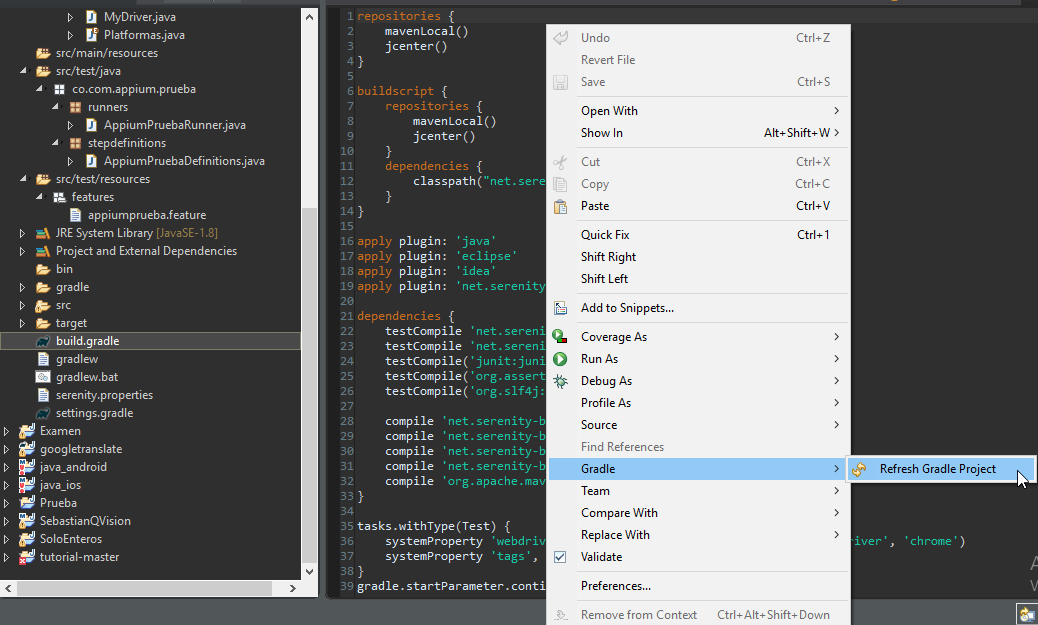
Una vez copiado, debemos refrescar gradle para que inicie la descarga de las dependencias, así que debemos dar clic derecho sobre el proyecto y seleccionar la opción "Gradle - Refresh Gradle Project".
C) A partir de este momento, empezaremos a modificar el arquetipo de nuestro proyecto, para que nuestro código quede mejor organizado y en futuro sea más fácil hacer refactor en caso de ser necesario.
Lo primero que haremos será eliminar los paquetes por defecto en los directorios src/main/java y src/test/java y crear en cada uno de ellos un paquete al cual nombraremos "co.com.appium.prueba".

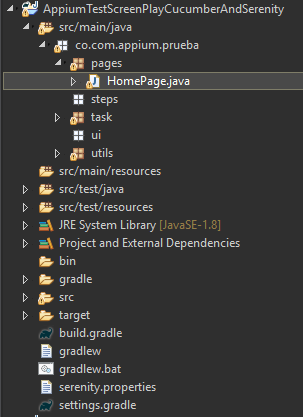
Dentro del paquete "co.com.appium.prueba" del directorio "src/main/java", crearemos los directorios que se encargarán de representar cada una de las capas de nuestro patrón de diseño, en nuestro caso usaremos el patrón de diseño Screenplay, de manera que necesitaremos como mínimo los paquetes: pages, steps, ui y a partir de allí todos los que consideremos necesarios, por ejemplo, se acostumbra a tener un paquete utils para almacenar allí las clases con funcionalidades transversales a la automatización.
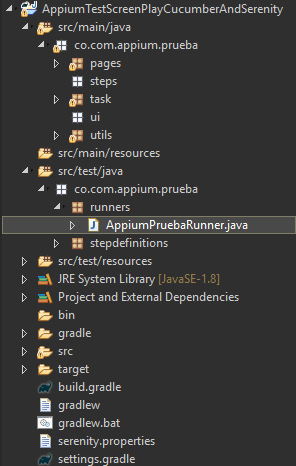
Dentro del paquete "co.com.appium.prueba" del directorio "src/main/java", crearemos los directorios "runners" y "stepdefinitions".
Por último crearemos el source folder "src/test/resources", para ello daremos click derecho en la raíz del proyecto, seleccionaremos la opción New - Source Folder.
D) A partir de este punto crearemos todo el código necesario para poder ejecutar nuestra prueba.
Dentro del directorio test, hay un source folder llamado "src/test/resources" cuya función es el almacenar todos aquellos elementos de la prueba que no son código java. Es allí donde se crea el paquete features, el cual almacenará todos los archivos.
Para ello primero daremos click derecho en el paquete "features" y seleccionaremos la opción New - File, en la ventana New File escribir "appiumprueba.feature" y aceptar. Copiar la historia de usuario en formato Gherkin.
1 2 3 4 5 6 7 8 9 10 11 12 13 14 15 16 17 18 19 20 21 22 23 24 |
Feature: Mathematical operation in calculator As a user I Want to use a calculator to perform an operation And check the result Scenario: Calculating with basic arithmetic operations - Sum Given I have a calculator When I add 4 and 7 Then the sum should be 11 Scenario: Calculating with basic arithmetic operations - Subtract Given I have a calculator When I subtract 9 and 2 Then the subtract should be 7 Scenario: Calculating with basic arithmetic operations - Multiply Given I have a calculator When I multiply 11 and 4 Then the multiply should be 44 Scenario: Calculating with basic arithmetic operations - Divide Given I have a calculator When I divide 30 and 3 Then the divide should be 10 |
Una vez hecho esto, veremos que Eclipse nos muestra unas advertencias en cada uno de los steps (Given, When, y Then), esto es porque Cucumber detecta que aún no existen los métodos que mapean a cada uno de los steps.
Lo siguiente es crear la clase que contendrá los métodos que corresponderán con cada uno de los steps del feature. Para ello lo que haremos será dar click derecho sobre el paquete “stepdefinitions” y crear la clase " AppiumPruebaDefinitions", pero no agregaremos ningún código por ahora.
Después de esto crearemos la clase runner que se encargará de ejecutar el feature "appiumprueba.feature", para ello crearemos una nueva clase en el paquete "runners", la cual llamaremos "AppiumPruebaRunner" y copiaremos el siguiente código.
1 2 3 4 5 6 7 8 9 10 |
@RunWith(CucumberWithSerenity.class) @CucumberOptions( features="src/test/resources/features/appiumprueba.feature", glue = "co.com.appium.prueba.stepdefinitions", snippets = SnippetType.CAMELCASE ) public class AppiumPruebaRunner { } |
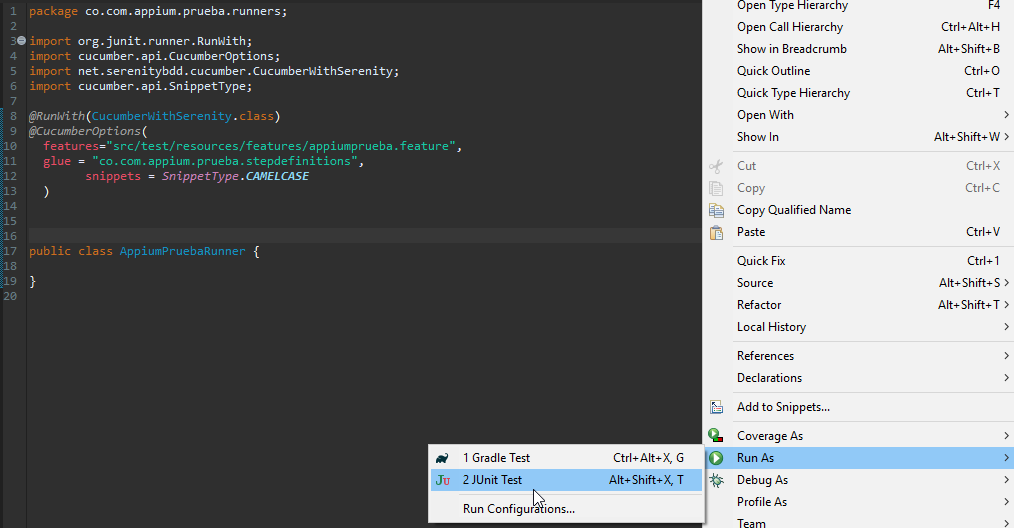
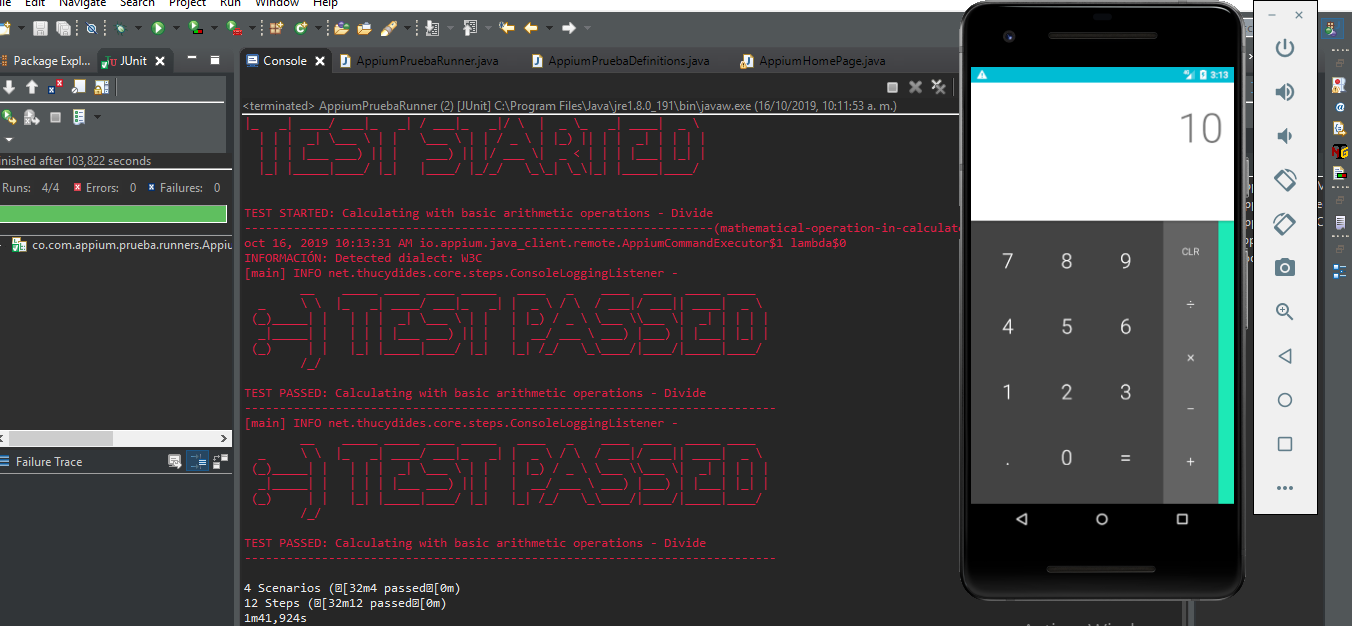
En este punto lo que haremos será ejecutar nuestra prueba dando click derecho sobre la clase "AppiumPruebaRunner" y seleccionaremos la opción Run As - Junit Test. Esto lo que hará será correr el proyecto y generar el reporte de Serenity con el resultado de la ejecución. En este caso como todavía no hemos creado ningún código de la prueba Serenity nos recomendará la implementación de los métodos que mapean a los steps del feature, de manera que los copiaremos y pegaremos dentro de la clase "AppiumPruebaStepDefinitions"
1 2 3 4 5 6 7 8 9 10 11 12 13 14 15 16 17 18 19 20 21 22 23 24 25 26 27 28 29 30 31 32 33 34 35 36 37 38 39 40 41 42 43 44 45 46 47 48 49 50 51 52 53 54 55 56 |
You can implement missing steps with the snippets below: @Given("^I have a calculator$") public void iHaveACalculator() throws Exception { // Write code here that turns the phrase above into concrete actions throw new PendingException(); } @When("^I add (\\d+) and (\\d+)$") public void iAddAnd(int arg1, int arg2) throws Exception { // Write code here that turns the phrase above into concrete actions throw new PendingException(); } @Then("^the sum should be (\\d+)$") public void theSumShouldBe(int arg1) throws Exception { // Write code here that turns the phrase above into concrete actions throw new PendingException(); } @When("^I subtract (\\d+) and (\\d+)$") public void iSubtractAnd(int arg1, int arg2) throws Exception { // Write code here that turns the phrase above into concrete actions throw new PendingException(); } @Then("^the subtract should be (\\d+)$") public void theSubtractShouldBe(int arg1) throws Exception { // Write code here that turns the phrase above into concrete actions throw new PendingException(); } @When("^I multiply (\\d+) and (\\d+)$") public void iMultiplyAnd(int arg1, int arg2) throws Exception { // Write code here that turns the phrase above into concrete actions throw new PendingException(); } @Then("^the multiply should be (\\d+)$") public void theMultiplyShouldBe(int arg1) throws Exception { // Write code here that turns the phrase above into concrete actions throw new PendingException(); } @When("^I divide (\\d+) and (\\d+)$") public void iDivideAnd(int arg1, int arg2) throws Exception { // Write code here that turns the phrase above into concrete actions throw new PendingException(); } @Then("^the divide should be (\\d+)$") public void theDivideShouldBe(int arg1) throws Exception { // Write code here that turns the phrase above into concrete actions throw new PendingException(); } |
Al final la clase AppiumPruebaDefinitions debería quedar de la siguiente manera.
1 2 3 4 5 6 7 8 9 10 11 12 13 14 15 16 17 18 19 20 21 22 23 24 25 26 27 28 29 30 31 32 33 34 35 36 37 38 39 40 41 42 43 44 45 46 47 48 49 |
public class AppiumPruebaDefinitions { @Given("^I have a calculator$") public void iHaveACalculator() throws Exception { } @When("^I add (\\d+) and (\\d+)$") public void iAddAnd(int arg1, int arg2) throws Exception { } @Then("^the sum should be (\\d+)$") public void theSumShouldBe(int arg1) throws Exception { } @When("^I subtract (\\d+) and (\\d+)$") public void iSubtractAnd(int arg1, int arg2) throws Exception { } @Then("^the subtract should be (\\d+)$") public void theSubtractShouldBe(int arg1) throws Exception { } @When("^I multiply (\\d+) and (\\d+)$") public void iMultiplyAnd(int arg1, int arg2) throws Exception { } @Then("^the multiply should be (\\d+)$") public void theMultiplyShouldBe(int arg1) throws Exception { } @When("^I divide (\\d+) and (\\d+)$") public void iDivideAnd(int arg1, int arg2) throws Exception { } @Then("^the divide should be (\\d+)$") public void theDivideShouldBe(int arg1) throws Exception { } } |
E) Ahora vamos a crear la clase la cual instanciara nuestro driver para que de esta manera appium inicie con la aplicación que necesitemos en un momento determinado.
Esta clase tendrá una característica la cual es que podrá manejar para iOS o para Android dependiendo de lo que se necesite, además también podrá manejar las capabilities para poder lanzar la ejecución en Kobiton la cual es una granja de móviles. (Estas capabilites estarán comentareadas por si las necesita utilizar en algún momento)
- Creamos la clase MyDriver en el paquete utils creado anteriormente
En esta agregaremos el siguiente código:
1 2 3 4 5 6 7 8 9 10 11 12 13 14 15 16 17 18 19 20 21 22 23 24 25 26 27 28 29 30 31 32 33 34 35 36 37 38 39 40 41 42 43 44 45 46 47 48 49 50 51 52 53 54 55 56 57 58 59 60 61 62 63 64 65 66 67 68 69 70 71 72 73 74 75 76 77 78 79 80 81 82 83 84 85 86 87 88 89 90 91 92 93 |
public class MyDriver { private static final Logger logger = Logger.getLogger(MyDriver.class.getName()); private static AppiumDriver<MobileElement> driver; static String envPlatform = "ANDROID"; public static Platformas plataforma = null; public static AppiumDriver<MobileElement> abrirApp(){ if (envPlatform.contains("ANDROID")) { plataforma = Platformas.ANDROID; } else if (envPlatform.contains("IOS")) { plataforma = Platformas.IOS; } String url = "http://127.0.0.1:4723/wd/hub"; DesiredCapabilities capabilities = new DesiredCapabilities(); switch (plataforma) { case IOS: try { capabilities.setCapability("deviceName", "iPhone 8"); capabilities.setCapability("udid", "0202bba73adcc99fa654db813d43e6e52faa49bf"); capabilities.setCapability("platformVersion", "12.1"); capabilities.setCapability("platformName", "iOS"); capabilities.setCapability("automationName", "XCUITest"); capabilities.setCapability("bundleId", "co.com.prueba.canalesmoviles.ProbandoElMundo"); capabilities.setCapability("noReset", false); /*String kobitonServerUrl = "https://estivenm:a12ce76e-b733-4d8e-881e-572b924279d8@api.kobiton.com/wd/hub"; capabilities.setCapability("sessionName", "Automation test session"); capabilities.setCapability("sessionDescription", ""); capabilities.setCapability("deviceOrientation", "portrait"); capabilities.setCapability("captureScreenshots", true); capabilities.setCapability("app", "kobiton-store:26510"); capabilities.setCapability("groupId", 444); capabilities.setCapability("deviceGroup", "KOBITON"); capabilities.setCapability("deviceName", "iPhone 7"); capabilities.setCapability("platformVersion", "12.1.2"); capabilities.setCapability("platformName", "iOS"); */ driver = new AppiumDriver<MobileElement>(new URL(url), capabilities); driver.manage().timeouts().implicitlyWait(60, TimeUnit.SECONDS); //driver.switchTo().alert().accept(); return driver; } catch (Exception e) { logger.log(Level.SEVERE, ExceptionMessages.EXCEPTION_NO_CREATE_DRIVER.getMensaje(), e); throw new MyBusinessException(ExceptionMessages.EXCEPTION_NO_CREATE_DRIVER.getMensaje(), e); } case ANDROID: try { capabilities.setCapability("deviceName", "emulator-5554"); //Nombre del dispositivo, en este caso del emulador // capabilities.setCapability("udid", "J7AXHM001253GB7"); // ID Del dispositivo si se trabaja en uno REAL capabilities.setCapability("platformVersion", "5.0"); capabilities.setCapability("platformName", "Android"); capabilities.setCapability("appPackage", "com.android.calculator2"); capabilities.setCapability("appActivity", "com.android.calculator2.Calculator"); capabilities.setCapability("noReset", true); /*String kobitonServerUrl = "https://estivenm:a12ce76e-b733-4d8e-881e-572b924279d8@api.kobiton.com/wd/hub"; capabilities.setCapability("sessionName", "Automation test session"); capabilities.setCapability("sessionDescription", ""); capabilities.setCapability("deviceOrientation", "portrait"); capabilities.setCapability("captureScreenshots", true); capabilities.setCapability("app", "kobiton-store:24713"); capabilities.setCapability("groupId", 444); capabilities.setCapability("deviceGroup", "KOBITON"); capabilities.setCapability("deviceName", "Moto G Plus (5th Gen)"); capabilities.setCapability("platformVersion", "7.0"); capabilities.setCapability("platformName", "Android"); capabilities.setCapability("noReset", "false");*/ driver = new AppiumDriver<MobileElement>(new URL(url), capabilities); driver.manage().timeouts().implicitlyWait(60, TimeUnit.SECONDS); return driver; } catch (Exception e) { logger.log(Level.SEVERE, ExceptionMessages.EXCEPTION_NO_CREATE_DRIVER.getMensaje(), e); throw new MyBusinessException(ExceptionMessages.EXCEPTION_NO_CREATE_DRIVER.getMensaje(), e); } default: logger.log(Level.SEVERE, ExceptionMessages.EXCEPTION_NO_SE_ENCONTRO_PLATAFORMA.getMensaje()); break; } return null; } public static AppiumDriver<MobileElement> getDriver(){ return driver; } public static Logger getLogger(){ return logger; } } |
Creamos otra clase Platformas en la cual manejaremos los dos S.O
1 2 3 4 |
public enum Platformas { ANDROID, IOS } |
Creamos otra clase ExceptionMessages con el manejo de excepciones.
1 2 3 4 5 6 7 8 9 10 11 12 13 14 15 16 17 18 19 20 21 22 23 24 25 26 |
public enum ExceptionMessages { EXCEPTION_AL_BUSCAR_ELEMENTO("No se encontro el elemento"), EXCEPTION_AL_CERRAR_INGRESO_CLAVE("No cerro sesion en ingreso clave"), EXCEPTION_AL_ESPERAR("No se espero el tiempo indicado"), EXCEPTION_AL_HACER_SCROLL("Error al hacer el scroll"), EXCEPTION_AL_OCULTAR_TECLADO("Error al ocultar el teclado"), EXCEPTION_AL_REFRESCAR_PANTALLA("Error al refrescar la pantalla"), EXCEPTION_AL_SELECCIONAR_UN_MES("Error al convertir numero de mes a nombre"), EXCEPTION_AL_SELECCIONAR_UN_TIPO_DOCUMENTO("Error al completar el numero de documento para IOS"), EXCEPTION_ERRORAL_PRESIONAR_BOTON("Error al presionar un boton"), EXCEPTION_ERROR_LEER_ARCHIVO("Error al abrir el archivo"), EXCEPTION_NO_CREATE_DRIVER("Error al crear el driver"), EXCEPTION_NO_SE_ENCONTRO_PLATAFORMA("Error al encontar la plataforma a ejecutar"); private final String mensaje; private ExceptionMessages(String mensaje) { this.mensaje = mensaje; } public String getMensaje() { return this.mensaje; } } |
Por último, creamos la clase MyBussinessException
1 2 3 4 5 6 7 |
public class MyBusinessException extends SerenityManagedException { public MyBusinessException(String message, Throwable testErrorException) { super(message, testErrorException); } } |
En la raíz del proyecto creamos un archivo con el nombre de serenity.properties
En el archivo serenity.properties agregaremos la siguiente información:
1 2 3 4 5 6 7 8 |
webdriver.driver = appium appium.platformName = ANDROID webdriver.timeouts.implicitlywait = 20000 webdriver.wait.for.timeout = 20000 serenity.take.screenshots=FOR_FAILURES #AFTER_EACH_STEP serenity.restart.browser.for.each = NEVER |
Ahora Creamos una clase HomePage en el paquete pages en el cual manipularemos los WebElement de la aplicación para poder interactuar con estos y crearemos los métodos que los utilizaran
1 2 3 4 5 6 7 8 9 10 11 12 13 14 15 16 17 18 19 20 21 22 23 24 25 26 27 28 29 30 31 32 33 34 35 36 37 38 39 40 41 42 43 44 45 46 47 48 49 50 51 52 53 54 55 56 57 58 59 60 61 62 63 64 65 66 67 68 69 70 71 72 73 74 75 76 77 78 79 80 81 82 83 84 |
public class HomePage { public HomePage(AppiumDriver<MobileElement> driver) { PageFactory.initElements(new AppiumFieldDecorator(driver), this); } // -------------- Elementos Calculadora -------------------- // @FindBy(id="com.android.calculator2:id/digit_0") WebElement digitoCero; @FindBy(id="com.android.calculator2:id/digit_1") WebElement digitoUno; @FindBy(id="com.android.calculator2:id/digit_2") WebElement digitoDos; @FindBy(id="com.android.calculator2:id/digit_3") WebElement digitoTres; @FindBy(id="com.android.calculator2:id/digit_4") WebElement digitoCuatro; @FindBy(id="com.android.calculator2:id/digit_7") WebElement digitoSiete; @FindBy(id="com.android.calculator2:id/digit_9") WebElement digitoNueve; @FindBy(id="com.android.calculator2:id/op_add") WebElement operacionSum; @FindBy(id="com.android.calculator2:id/op_sub") WebElement operacionSub; @FindBy(id="com.android.calculator2:id/op_mul") WebElement operacionMul; @FindBy(id="com.android.calculator2:id/op_div") WebElement operacionDiv; @FindBy(id="com.android.calculator2:id/eq") WebElement signoIgual; @FindBy(id="com.android.calculator2:id/formula") WebElement resultadoOperacion; // -------------- Metodos ---------------// public void operadorSuma() { digitoCuatro.click(); operacionSum.click(); digitoSiete.click(); signoIgual.click(); } public void operadorResta() { digitoNueve.click(); operacionSub.click(); digitoDos.click(); signoIgual.click(); } public void operadorMult() { digitoUno.click(); digitoUno.click(); operacionMul.click(); digitoCuatro.click(); signoIgual.click(); } public void operadorDiv() { digitoTres.click(); digitoCero.click(); operacionDiv.click(); digitoTres.click(); signoIgual.click(); } public String resultOperacion() { return resultadoOperacion.getText(); } |
Crearemos nuestra clase de steps, la llamaremos AppiumHomePage y esta estará ubicada en el paquete “steps”, contendrá lo siguiente:
1 2 3 4 5 6 7 8 9 10 11 12 13 14 15 16 17 18 19 20 21 22 23 24 25 26 27 28 29 30 31 32 33 34 35 36 37 38 39 40 41 42 43 44 45 46 47 48 49 50 51 |
public class AppiumHomePage { HomePage homePage; @Step public void openDriverAppium() { MyDriver.abrirApp(); homePage = new HomePage(MyDriver.getDriver()); } @Step public void testOperationSum() { homePage.operadorSuma(); } @Step public void testOperationSub() { homePage.operadorResta(); } @Step public void testOperationMul() { homePage.operadorMult(); } @Step public void testOperationDiv() { homePage.operadorDiv(); } @Step public void validationResultSum() { Assert.assertEquals(homePage.resultOperacion(), "11"); } @Step public void validationResultSub() { Assert.assertEquals(homePage.resultOperacion(), "7"); } @Step public void validationResultMul() { Assert.assertEquals(homePage.resultOperacion(), "44"); } @Step public void validationResultDiv() { Assert.assertEquals(homePage.resultOperacion(), "10"); } } |
Una vez tengamos estas clases implementadas nos dirigimos a la clase de definiciones AppiumPruebaDefinitions y establecemos los métodos para cada etiqueta de la siguiente manera
1 2 3 4 5 6 7 8 9 10 11 12 13 14 15 16 17 18 19 20 21 22 23 24 25 26 27 28 29 30 31 32 33 34 35 36 37 38 39 40 41 42 43 44 45 46 47 48 49 50 51 | public class AppiumPruebaDefinitions { @Steps AppiumHomePage stepsAppium; @Given("^I have a calculator$") public void iHaveACalculator() throws Exception { stepsAppium.openDriverAppium(); } @When("^I add (\\d+) and (\\d+)$") public void iAddAnd(int arg1, int arg2) throws Exception { stepsAppium.testOperationSum(); } @Then("^the sum should be (\\d+)$") public void theSumShouldBe(int arg1) throws Exception { stepsAppium.validationResultSum(); } @When("^I subtract (\\d+) and (\\d+)$") public void iSubtractAnd(int arg1, int arg2) throws Exception { stepsAppium.testOperationSub(); } @Then("^the subtract should be (\\d+)$") public void theSubtractShouldBe(int arg1) throws Exception { stepsAppium.validationResultSub(); } @When("^I multiply (\\d+) and (\\d+)$") public void iMultiplyAnd(int arg1, int arg2) throws Exception { stepsAppium.testOperationMul(); } @Then("^the multiply should be (\\d+)$") public void theMultiplyShouldBe(int arg1) throws Exception { stepsAppium.validationResultMul(); } @When("^I divide (\\d+) and (\\d+)$") public void iDivideAnd(int arg1, int arg2) throws Exception { stepsAppium.testOperationDiv(); } @Then("^the divide should be (\\d+)$") public void theDivideShouldBe(int arg1) throws Exception { stepsAppium.validationResultDiv(); } } |
Para finalizar tenemos creada la clase AppiumPruebaRunner dentro del paquete runners esta es la clase principal desde donde lanzaremos la prueba.
Desde la clase AppiumPruebaRunner le damos clic derecho Run As Junit Test.
Última modificación: lunes, 11 de mayo de 2020, 22:29